
|
Straight FAQ's on FEMA Surplus Civil Defense Meters with Retail and Wholesale Sources Listed! |
|
for Potassium Iodide (KI) tablets, Potasium Iodate (KIO3) pills, and all forms of radiation protection iodine! |
| ||||||
| App. A.3: Small-Pole Shelter |
|


PROTECTION PROVIDED
Against fallout radiation: Protection Factor 1000 (PF 1000), if the shelter is covered with at least 3 ft of earth. That is, a person in the open outside this shelter will receive a gamma ray dose 1000 times greater than he will receive inside the shelter. See drawings at the end of Appendix A.3.
Against blast: This shelter is excellent for preventing fatalities if it is built with strong expedient blast doors; it is still quite good ifbuilt without them. (These instructions are for fallout shelters. The instructions for making blast doors and other essentials for adequate blast protection are given in Appendix D. Without blast doors, occupants are likely to suffer serious injuries above 7 psi.)
Against fire: Excellent, if sufficiently distant from fires that produce carbon monoxide and toxic smoke.
WHERE PRACTICAL
In wooded areas with small trees, for builders who have a saw (bow saw, crosscut, or chain saw) and digging tools. Any location is suitable if the necessary poles may be obtained there. Try to avoid roots.
For belowground, semiburied, or aboveground construction. (However, aboveground construction requires the excavation and movement of so much earth that it is not practical for 2-day construction by families with only hand tools.)
FOR WHOM PRACTICAL
For families or other groups with most members able to work hard 12 hours a day for 2 days. (Most people do not realize how hard and long they can work if given a strong incentive.)
CAPACITY
The drawings and lists of materials given in these instructions are for a 12-person shelter. For each additional occupant beyond 12, add 1 ft to the length of the shelter room.
This shelter requires less work and materials per occupant if its room is sized for about 24 persons, because the entrances are the same regardless of the length of the room. (To make the shelter room twice as long, each of the horizontal, ladder-like braces on the floor and near the ceiling of the room can be made with two poles on a side, rather than one long pole on a side.)
If the room is sized for more than 24 people, management and hygiene problems become more difficult when it is occupied.
For 12 people to live for many days in this shelter without serious hardship, the benches and bunks must be built with the dimensions and spacings given in the illustration. Or, materials must be available for making and suspending 12 expedient bedsheet hammocks that can be converted each day into 12 bedsheet-chairs.
BUILDING INSTRUCTIONS
1. Study both of the two drawings (Fig. A.3.1 and A.3.2 at the end of Appendix A.3) and read all of these instructions before beginning work. CHECK OFF EACH STEP WHEN COMPLETED.
2. By the time the shelter is finished, plan to have completed (1) a ventilating pump (a KAP 24 in wide and 36 in. high), essential except in cold weather, and (2) the storage of at least 15 gallons of water per occupant.
Book Page: 170
3. Start to assemble the required materials. For building a 12-person Small-Pole Shelter, the materials are:
° Green poles. No pole should have a small end of less diameter than the minimum diameter specified for its use by Figs. A.3.1 and A.3.2. The table below lists the number and sizes of poles needed to build a 12-person Small-Pole Shelter.
| Pole Length | Minimum Diameter of Small End | Number of Poles Required | Widthb |
| 6 ft 2 in. | 5 in. | 2 | - |
| 3 ft 1 in. | 5 in. | 12 | - |
| 2 ft 4 in.a | 5 in. | 12 | - |
| 10 ft 8 in. | 5 in. | - | 7 ft. |
| 8 ft 8 in. | 5 in. | - | 7 ft. |
| 10 ft 6 in. | 4 in. | 4 | - |
| 7 ft 2 in. | 4 in. | - | 47 ft. |
| 5 ft 6 in.a | 4 in. | 12 | - |
| 6 ft 10 in. | 4 in. | - | 3 ft. |
| 6 ft 3 in. | 4 in. | 8 | - |
| 2 ft 6 in.a | 4 in. | 16 | - |
| 2 ft 3 in. | 4 in. | 4 | - |
| 5 ft 2 in. | 3-1/2 in. | - | 8 ft. |
| 3 ft 10 in. | 3-1/2 in. | - | 36 ft. |
| 10 ftc | 2 in. | 12 | - |
a To be shortened to fit for crossbraces.
b Width equals the distance measured across a single layer of poles when a sufficient number of poles are laid on the ground side by side and touching, to cover a rectangular area.
c For supports during construction.
NOTE: The above list does not include flooring materials, to be placed between the poles of the ladder-like braces on the earth floor.
° Rainproofing materials: Preferably one 100-ft roll, 12 ft wide, of 6-mil polyethylene. The minimum amount needed is 200 sq. ft. of 4-mil polyethylene, or 200 sq. ft of other waterproof plastic such as tablecloths, shower curtains, and or vinyl floor covering. Also include 100 ft. of sticks for use in drainage ditch drains (1/2-in. diameter, any lengths).
° Nails, wire, and; or cord: Ten pounds of 40-penny nails plus 4 pounds of 16-penny nails are ideal. However, 7 pounds of 16-penny nails can serve.
° Boards for benches and overhead bunks, if bedsheet-hammocks are not to be used. (Boards are desirable, but not essential; small poles can be used instead.) 2 X 4-in. boards 70 feet for frames (or use 3-in.-diameter poles). 1 X 8-in. boards 100 feet (or use 1-to 2-in-diameter poles).
° Materials to build a homemade ventilating pump (a KAP 24 in. wide and 36 in. high see Appendix B) and to store at least 15 gallons of water per occupant (see Chapter 8).
4. Desirable muscle-powered tools for building a 12-person, Small-Pole Shelter are listed below. (Most builders have succeeded without having this many tools. A backhoe, chain saws, and other mechanized equipment would be helpful, but not essential.)
| Tools | Quantity |
| Ax, long-handle | 2 |
| Bow-saw, 28-in. | 2 |
| (or 2-man crosscut saw) | 1 |
| Pick | 2 |
| Shovel, long-handle | 3 |
| Claw hammer | 2 |
| File, 10-in. | 1 |
| Steel tape, l0-ft | 1 |
(Also useful: a 50-ft steel tape and 2 hatchets)
5. To help drain the floor, locate the shelter so that the original ground level at the entrance is about 12 inches lower than the original ground level at the far end of the shelter unless the location is in a very flat area.
6. Stake out the trench for the entire shelter. Even in very firm ground, if the illustrated 12-person shelter is being built, make the excavation at the surface 9 ft 8 in. wide and 18 ft long (3 ft longer than the entire length of the wooden shelter). The sloping sides of the excavation are necessary, even in very firm earth, to provide adequate space for backfilling and tamping. (The trench illustrated in Fig. A.3.l is 6 ft 4 in. deep, to minimize work when providing only for excellent fallout protection. For improved blast protection, the trench should be at least 7 ft deep.)
7. Check the squareness of the staked trench outline by making its diagonals equal.
8. Clear all brush, tall grass, and the like from the ground, to a distance of 10 ft all around the staked location so that later you can easily shovel loose earth back onto the roof.
9. If the ground is unstable, excavate with sides that are appropriately less steep.
10. When digging the trench for the shelter, use a measuring stick 7 ft 8 in. long (the minimum bottom width) to repeatedly check the excavation width.
Book Page: 171


11. When digging with a shovel, pile the earth dug from near ground level about 10 ft. away from the edges of the excavation. Earth dug from 5 or 6 ft below ground level then can easily be piled on the surface only 1 to 5 ft from the edge of the excavation.
12. Finish the bottom of the excavation so that it slopes vertically 1/2 in. per foot of length toward the entrance, and also slopes toward the central drain ditch. (Later, sticks covered with porous fabric should be placed in the ditches, to serve like a crushed-rock drain leading to a sump.)
13. While some persons are excavating, others should be cutting green poles and hauling them to the site. Cut poles that have tops no smaller than the specified diameters for each type of pole (not including the bark).
14. For ease in handling poles, select wall and roof poles with top diameters no more than 50% larger than the specified minimum diameters.
15. Sort the poles by size and lay all poles of the same size together, near the excavation.
16. Before the excavation is completed, start building the ladder-like, horizontal braces of the shelter frame. Construct these braces on smooth ground near the excavation. Place two straight poles, each 10 ft 6 in. long (with small-end diameters of 4 in.), on smooth ground, parallel and 6 ft 2 in. apart. Hold these poles securely so that their outer sides are exactly 6 ft 2 in. apart, by driving two pairs of stakes into the ground so that they just touch the outsides of the two long poles. Each of the four stakes should be located about one foot from the end of a pole. To keep the 10 ft 6 in. poles from being rotated during the next step, nail two boards or small poles across them perpendicularly as temporary' braces, about 4 ft apart.
Then with an ax or hatchet, slightly flatten the inner sides of the two poles at the spots where the ends of the 6 cross-brace poles will be nailed. Next, saw each cross-brace pole to the length required to fit snugly into its place. Finally, toenail each cross-brace pole in place, preferably with two 40-penny nails in each end.
17. Place the lower, ladder-like horizontal brace of the main room on the floor of the completed excavation.
18. Build the frame of the main room. Near the four corners of the room, secure four of its wall poles in their final vertical positions by nailing, wiring, or tying temporary brace-poles to the inner sides of these 4 wall poles and to the inner sides of the two long poles of the ladder-like horizontal brace on the bottom of the excavation. To keep the two pairs of vertical wall poles exactly 6 ft 2 in. apart until the upper ladder-like horizontal brace is secured in its place, nail a temporary horizontal brace across each pair of vertical poles, about 1 ft below their tops.
19. To support the upper ladder-like horizontal brace, nail blocks to the inner sides of the four vertical wall poles, as shown in the lower right- hand corner of the pictorial view, Fig. A.3.2. If you have large nails, use a block about 3 in. thick and 6 in. long, preferably cut from a green, 4-in.- diameter pole.
20. In the finished shelter, DO NOT leave any vertical support poles under the long poles of the upper ladder-like horizontal brace; to do so would seriously reduce the usable space along the walls for benches, bunks, and occupants.
21. While some workers are building the frame of the main room, other workers should make the four ladder-like horizontal braces for the two entrances, then make the complete entrances. To keep the ladder-like horizontal braces square during construction and back-filling, nail a temporary diagonal brace across each one.
22. When the four wall poles and the two ladder-like horizontal braces of the main room are in place, put the remaining vertical wall poles in place, touching each other, until all walls are completed. When placing the wall poles, keep them vertical by alternately putting a butt and a top end uppermost. Wall poles can be held in position by backfilling and tamping about a foot of earth against their lower ends, or they can be wired in position until backfilled.
23. Be sure to use the two 5-in.-diameter poles (6 ft 2 in. long) by placing one next to the top and the other next to the bottom of each of the main doorways to the room. Study the drawings. Use braces, each 2 ft 3 in. long, to hold apart the top and bottom of each doorway thus making sure that a 24-in.-wide air pump can swing in either doorway.
24. To prevent earth from coming through the cracks between wall poles, cover the walls with cloth, plastic, rugs, roofing, or even cardboard. If none of these are available, use sticks, twigs, or grass to cover the wider cracks.
Book Page: 172
25. After all horizontal bracing and vertical wall poles are in place, begin backfilling, putting earth between the walls and trench sides. Pay particular attention to the order of filling. The earth fill behind all the walls must be brought up quite evenly, so that the earth fill behind one side is no more than 12 in. higher at any one time than the earth on the opposite side. Lightly tamp the earth fill in 6-in. layers. A pole makes a good tamper; do not use a mechanical tamper.
26. Next, lay the roof poles side by side, touching each other on top of the wall poles. Cover at least the larger cracks with plastic, roofing, boards, or sticks to keep earth from falling through. If the earth is sandy, cover the whole roof with some material such as bedsheets or plastic to keep sand from running through the cracks.
CAUTION: Donot try to rainproof this flat roof and simply cover it with earth. If you do, water will seep straight through the loose earth cover, puddle on the flat roofing material, and leak through the joints between pieces of roofing material or through small holes.
27. Mound earth over the shelter, piling it about 15 in. deep along the centerline of the roof and sloping it toward the sides of the roof, so that the earth is only about 2 in. deep over the ends of the roof poles. (Preparatory to mounding earth onto the roof, place grade stakes in position so you will be able to know the locations and depths of roof poles as you cover them.) Continue these slopes to two side drainage ditches. Smooth this mounded earth with a rake or stick and remove any sticks or rocks likely to puncture the rainproof roofing material to be laid on it.
28. Place rainproofing material on top of the smooth, mounded earth as shown in sections of the drawings in Fig. A.3.l to make a "buried roof." Plastic film, such as 4-mil polyethylene, is preferable. Roofing material, plastic shower curtains and tablecloths, or canvas can also be used. Be sure to overlap adjoining pieces.
29. Place the rest of the earth cover over the shelter, being sure that the corners of the shelter have at least 2-1/2 ft of earth over them. Mound the dirt, smoothing its surface so that water will tend to run off to the surface drainage ditches which should be dug all around the edges of the mounded earth..
30. Build the benches and overhead bunks. If boards are available, use them; if not, use small, straight poles. On each side, build a row of benches and bunks 9 ft long, centered in the shelter. In order to use the shelter space to the greatest advantage, make the heights and widths of the benches and bunks the same as the thoroughly tested heights (14 in. and 4 ft 5 in.) and widths (16 in. and 24 in.) given by Fig. A.3.2. Also be sure to space their vertical supports 3 ft apart so two adults can sit between each pair of vertical bunk supports.
31. Narrow the ends of the overhead bunks so that the aisle between them is about 28 in. wide for a distance of 38 in. from each doorway. This allows room for installation and operation of an expedient air pump (a KAP) for prevention of dangerous overheating in warm weather.
32. Place a canopy (open on all sides) over each entrance, to minimize the entry of sand-like fallout particles or rain.
33. To improve the floor, lay small poles between the lower brace poles, so that the floor is approximately level. Or, use sticks covered with scrap boards.
34. Fill all available water containers, including pits which have been dug and lined with plastic, then roofed with available materials. If possible, disinfect all water stored in expedient containers, using one scant teaspoon of a chlorine bleach, such as Clorox, for each 10 gallons of water. Even if only muddy water is available, store it. If you do not have a disinfectant, it may be possible to boil water when needed.
35. Put all of your emergency tools inside your shelter.
36. As time and materials permit, continue to improve your chances of surviving by doing as many of the following things as possible:
(1) Make a homemade fallout meter, as described in Appendix C, and expedient lights. (Prudent people will have made these extremely useful items well ahead of time.)
(2) Install screens or mosquito netting over the two openings, if mosquitoes or flies are a problem. Remember, however, that screen or netting reduces the air flow through a shelter -- even when the air is pumped through with a KAP.
Book Page: 173
EXPEDIENT VENTILATION AND COOLING
(Those workers who are to work only on the shelter itself, if pushed for time, need not read this section before beginning their work.)
Install a KAP (one that is 24 in. wide and 36 in. high) near the top of the doorway through which you can feel air naturally flowing into the shelter room at that time. (If the direction of the natural air flow changes, move the KAP to the other opening.) To enable the KAP to efficiently pump fresh air from the outdoors all the way through the shelter, block the lower half of the doorway in which the KAP is installed with a quickly removable covering, such as a plastic-covered frame made of sticks. Be sure to connect the KAP's pullcord only 11 in. below its hinge line. This prevents excessive arm motions which would cause unnecessary fatigue.
If short of time or materials, make a small Directional Fan.
In windy or cold weather, control the natural flow of air through the shelter by hanging adjustable curtains in the doorways at both ends, and or by making and using trapdoors on the tops of the vertical entryways. For adjustable curtains, use pieces of plastic, each with a supporting stick attached to its upper edge. This allows for different sized openings in the doorways: (1) an opening under the lower edge of the adjustable curtain at the air intake end of the room, and (2) an opening over the top of the curtain at the air-exhaust end of the room. In cold weather, this arrangement usually will provide adequate chimney-type ventilation for the shelter without using an air pump.
Book Page: 174
Fig. A.3.1. Plan and Elevation of Small-Pole Shelter (ORNL-DWG 71-3428 R4) 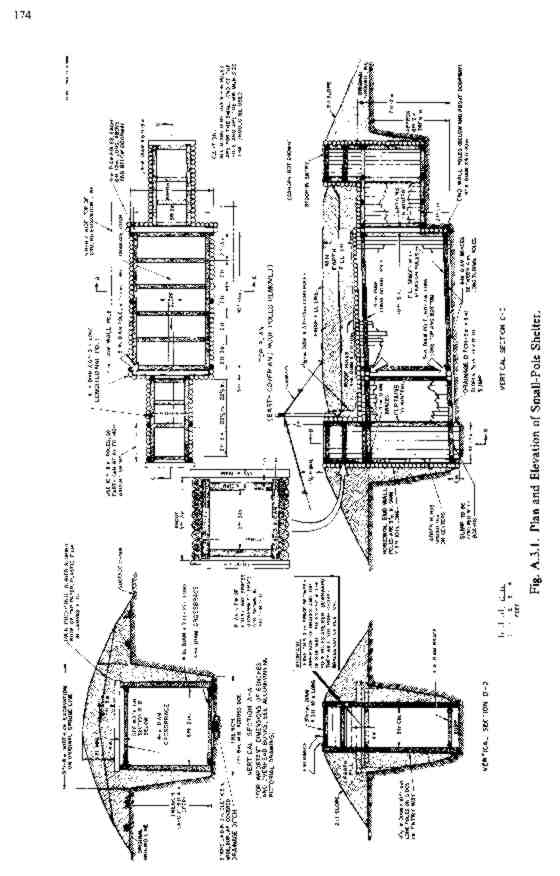
Book Page: 175
Fig. A.3.2. Pictorial View of Small-Pole Shelter (ORNL-DWG 71-3429 R3) 
Book Page: 176
| |
|
for Potassium Iodide (KI) tablets, Potasium Iodate (KIO3) pills, and all forms of radiation protection iodine! |
|
Straight FAQ's on FEMA Surplus Civil Defense Meters with Retail and Wholesale Sources Listed! |