
|
One-Stop Straight FAQ's with free plans, books & ready made shelter sources! |
|
Straight FAQ's on FEMA Surplus Civil Defense Meters with Retail and Wholesale Sources Listed! |
|
for Potassium Iodide (KI) tablets, Potasium Iodate (KIO3) pills, and all forms of radiation protection iodine! |
| ||||||
| Ch. 8: Water |
|


WATER AND SALT REQUIREMENTS
Painful thirst has been experienced by very few Americans. We take for granted that we will always have enough water to drink. Most of us think of "food and water" in that order, when we think of survival essentials that should be stored. But if unprepared citizens were confined in a shelter by heavy fallout, they soon would realize that they should have given first priority to storing adequate water.
For the kidneys to eliminate waste products effectively, the average person needs to drink enough water so that he urinates at least one pint each day. (When water is not limited, most people drink enough to urinate 2 pints. Additional water is lost in perspiration, exhaled breath, and excrement.) Under cool conditions, a person could survive for weeks on 3 pints of water a day if he eats but little food and if that food is low in protein. Cool conditions, however, would be the exception in crowded belowground shelters occupied for many days. Under such circumstances four or five quarts of drinking water per day are essential in very hot weather, with none allowed for washing. For a two-week shelter stay, 15 gallons per person should be stored in or close to a shelter. This amount usually would provide for some water remaining after two weeks, to prevent thirst in case fallout dangers were to continue.
In a 1962 Navy shelter occupancy test lasting two weeks, 99 sailors each consumed an average of 2.4 quarts (2.3 liters) of water per day.15 The test was conducted in August near Washington, D.C.; the weather was unseasonably cool. The shelter was not air-conditioned except during the last two days of the test.
When one is sweating heavily and not eating salty food, salt deficiency symptoms especially cramping are likely to develop within a few days. To prevent this, 6 or 8 grams of salt (about 1/4 oz, or 1/2 tablespoon) should be consumed daily in food and drink. If little or no food is eaten, this small daily salt ration should be added to drinking water. Under hot conditions, a little salt makes water taste better.
CARRYING WATER
Most families have only a few large containers that could be used for carrying water to a shelter and storing it in adequate amounts for several weeks. Polyethylene trash bags make practical expedient water containers when used as waterproof liners inside smaller fabric bags or pillowcases. (Plastic bags labeled a& being treated with insecticides or odor-controlling chemicals should not be used.) Figure 8.1 shows a teenage boy carrying over 10 gallons (more than 80 pounds) of water, well balanced front and back for efficient packing. Each of his two burlap bags is lined with two 20-gallon polyethylene trash bags, one inside the other. (To avoid possible pinhole leakage it is best to put one waterproof bag inside another.)
To close a plastic bag of water so that hardly any will leak out, first spread the top of the bag until the two inner sides of the opening are together. Then fold in the center so that the folded opening is 4 thicknesses, and smooth (see Fig. 8.2). Continue smoothly folding in the middle until the whole folded-up opening is only about 1-1/2 inches wide. Then fold the top of the bag over on itself so the folded-up opening points down. With a strip of cloth or a soft cord, bind and tie the folded-over part with a bow knot, as illustrated.
Book Page: 67
Fig. 8.1. Carrying 80 pounds of water in two burlap bags, each lined with two larger plastic trash bags, one inside the other. (Photograph) 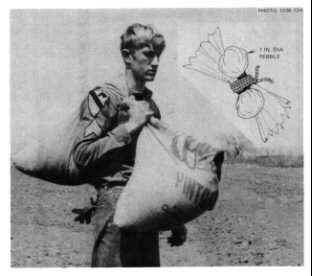
Fig. 8.2. Folding and tying the mouth of a water-filled plastic bag. (Illustration) 
For long hikes, it is best to tie the water-holding plastic bags so that the openings 'are higher than the water levels inside.
To transport this type of expedient water bag in a vehicle, tie a rope around the fabric outer bag near its opening, so that the rope also encircles and holds the plastic liner-bags just below their tied-shut openings. The other end of this rope should then be tied to some support, to keep the openings higher than the water level.
To use two fabric bags or pillowcases to carry a heavy load of water contained in larger plastic liner- bags connect the two fabric bags as shown in Fig. 8.1.
A small pebble, a lump of earth, or a similar object should be tied inside the opening of each bag before the two are tied together, to hold them securely. The bag that is to be carried in front should have the pebble tied about 4 inches further down from the edge of its opening than the pebble tied in the bag to be carried in back. This keeps the pebbles from being pressed against the carrier's shoulder by a heavy load.
A pair of trousers with both legs tied shut at the bottoms can be used to carry a balanced load if pillowcases or other fabric bags are not at hand. Such a balanced load can be slung over the shoulder with the body erect and less strained than if the same weight were carried in a single bag-like pack on the back. However, trouser legs are quite narrow and do not provide room to carry more than a few gallons.
To prevent water from slowly leaking through the tied-shut openings ofplastic bags, the water levels inside should be kept below the openings.
STORING WATER
When storing expedient water bags in a shelter, the water levels inside should be kept below the openings.
Not many expedient shelters would be large enough to store an adequate volume of water for an occupancy lasting two or more weeks. Plastic-lined storage pits, dug in the earth close to the shelter, are dependable for storing large volumes of water using cheap, compact materials.
Fig. 8.3. Vertical section of cylindrical water storage pit lined with two 30-gallon waterproof plastic bags. This pit held about 20 gallons. (Illustration) ORNL- DWG 77- 0423R 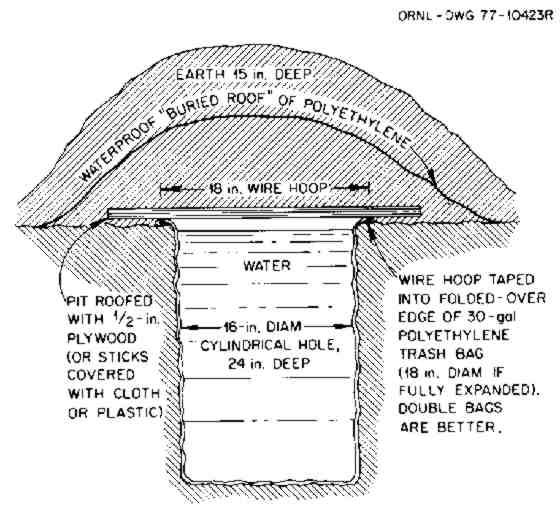
Book Page: 68
Figure 8.3 shows a cylindrical water-storage pit dug so as to have a diameter about two inches smaller than the inflated diameter of the two 30-gallon polyethylene trash bags lining it (one bag inside the other). Before a plastic bag is placed in such a pit, the ends of roots should be cut off flush to the wall with a sharp knife, and sharp rocks should be carefully removed.
The best way to keep the upper edges of the pit lining bags from slipping into the pit is shown in Fig. 8.3: Make a circular wire hoop the size of the opening of the bag, and tape it inside the top. In firm ground, the upper edges of double bags have been satisfactorily held in place simply by sticking six large nails through the turned-under edges of the bags and into the firm earth.
Figure 8.3 shows how to roof and cover a water storage pit so as to protect the water. The "buried roof" of waterproof material prevents any contamination of the stored water by downward-percolating rainwater, which could contain bacteria or small amounts of radioactive substances from fallout. The thick earth cover over the flexible roofing gives excellent blast protection, due to the earth arching that develops under blast pressure. In a large Defense Nuclear Agency blast test, a filled water-storage pit of the size illustrated was undamaged by blast effects at an overpressure range which could demolish the strongest aboveground buildings (53 psi).
A simpler way to store water is illustrated in Fig.8.4. If the soil is so unstable that an unshored water storage pit with vertical sides cannot be dug, the opening of the bag (or of one bag placed inside another) can simply be tied shut so as to minimize leakage (see Fig. 8.4). Fill the bag with water, tie it, and place it in the pit. Then bury it with earth to the level of the water inside. A disadvantage of this method is leakage through the tied-shut openings due to pressure of loose earth on the bag. To lessen leakage, leave an air space between the filled bag and a roofing of board or sticks, so that the weight of earth piled on top of the roofing will not squeeze the bag. This storage method has another disadvantage: after the earth covering and the roof are removed, it is difficult to bail out the water for use because as water is bailed out, the loose surrounding earth moves inward and squeezes the bag above the lowered water level.
Fig. 8.4. These two 30-gallon polyethylene trash bags, one inside the other, held 16 gallons of water. They were undamaged by 50-psi blast effects while buried in dry, very light soil. The plywood roof and the earth placed over the water bag were removed before this picture was taken. 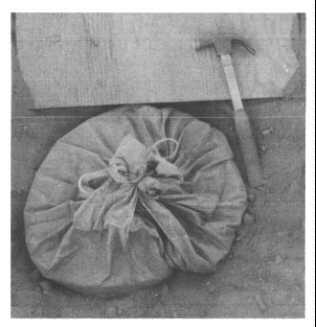
Fig. 8.5. Post-blast view of plastic-lined water storage pit undamaged at a 6.7-psi overpressure range. This pit held about 200 gallons. 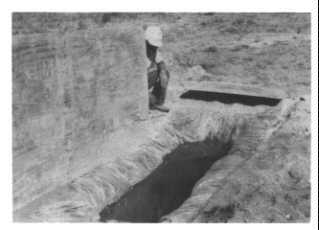
Large volumes of water can be stored in plastic lined rectangular pits. In order to roof them with widely available materials such as ordinary ))-inch plywood or small poles, the pits should be dug no wider than 3 feet. Figure 8.5 pictures such a pit: 8 feet long, 27 inches wide, and 30 inches deep. It was lined with a 10-foot-wide sheet of 4-mil polyethylene. The edges of this plastic sheet were held in place by placing them in shallow trenches dug near the sides of the pit and covering them with earth.
Book Page: 69
Earth was mounded over the plywood roof to a depth of about 30 inches, with a "buried roof" of polyethylene. The earth cover and its "buried roof" were similar to the pit covering illustrated by Fig. 8.3. This rectangular pit contained about 200 gallons of water. No water leaked out after the pit had been subjected to blast effects severe enough to have flattened most substantial buildings. However, rectangular pits at higher overpressures failed, due to sidewall caving that caused leaks.
In a subsequent blast test by Boeing Aerospace Company, a plastic-lined water pit was undamaged at the 200-psi overpressure range. First a rectangular pit 4 ft. wide, 12 ft. long, and 2 ft. deep was dug. Then inside this pit a 2 x l0 x 2-ft. water-storage pit was dug, and lined with plastic film. After being filled full of water, the storage pit was covered with plywood, on which was shoveled 2 ft. of earth.
Plastic garbage cans are usually watertight; most used metal garbage cans are not. If thoroughly cleaned and disinfected with a strong chlorine bleach solution, watertight garbage cans can serve for emergency water storage, as can some wastebaskets. If new plastic film is available, it can be used as a lining to waterproof any strong box. To lessen the chances of the plastic being punctured, rough containers first should be lined with fabric.
If shelter is to be taken in or near a building, water trapped in hot water heaters and toilet flush tanks or stored in tubs might be available after an attack.
SIPHONING
Pouring water out of a heavy water-storage bag is inconvenient and often results in spillage. Dipping it out can result in contamination. If a tube or piece of flexible garden hose is available, siphoning (see Fig. 8.6) is the best way. A field-tested method is described below. To prevent the suction end of the tube from being obstructed by contact with the plastic liner of the bag, tape or tie a wire "protector" to the end, as pictured later in this section.
To start siphoning,' suck on the tube until water reaches your mouth. Next fold over the tube near its end, to keep the tube full. Lower its closed end until it is near its position shown in Fig. 8.6. Then release your hold on the tube, to start siphoning.
To cut off the water, fold over the tube and secure it shut with a rubber band or string.
(Illustration)Fig. 8.6. Using a tube to siphon water from a fabric bag lined with a larger plastic bag. ORNL-DWG 78-14676 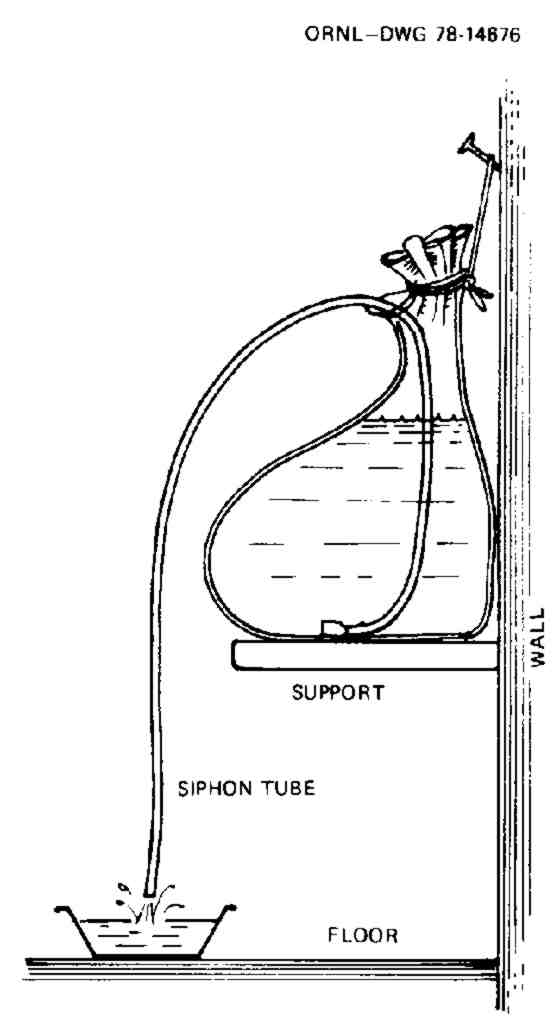
Water can be siphoned from a covered water storage pit into a belowground shelter so that the siphon will deliver running water for weeks, if necessary. The Utah family mentioned earlier siphoned all they needed of the 120 gallons of water stored in a nearby lined pit. A field-tested method of siphoning follows:
1. Dig the water storage pit far enough away from the shelter so that the covering mounds will not interfere with drainage ditches.
2. Use a flexible tube or hose which is no more than 25 feet long. For a single family, a flexible rubber tube with an inside diameter of inch (such as surgical tubing) would be best. A flexible 2-inch hose of the type used with mobile homes and boats serves well. As indicated by Fig. 8.7, the tube should be long enough to extend from the bottom of the water pit to within about a foot of the shelter floor.
3. Make sure that the end in the water pit will not press against plastic and block the flow of water. This can be avoided by (1) making and attaching a wire "protector" to the end of the tube, as shown in Fig. 8.8, or (2) taping or tying the end to a rock or other object, to keep the end in the desired position.
4. Protect the tube by placing it in a trench about 4 inches deep. This small trench is best dug before roofing either the storage pit or the shelter. Be sure a roof pole or board does not crush the tube. Cover the tube with earth and tie it so that the end in the storage pit cannot be accidentally pulled out of position.
Book Page: 70
Fig. 8.7. Water siphoned into a belowground shelter. ORNL-DWG 78-11471
(Illustration) 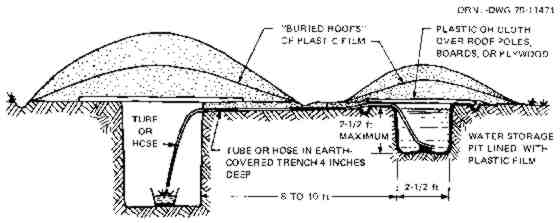
Fig. 8.8. Two wire "protectors," each made of two pieces of coathanger wire taped to a 1/2 inch flexible hose and a rubber tube. Shown on the right is a tube closed with a rubber band to stop a siphoned flow of water. (Illustration) 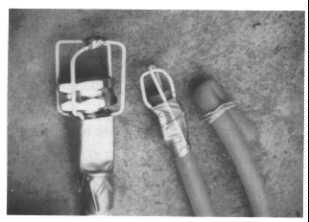
5. To start the flow of water into the shelter, hold the free end of the tube at about the height of the surface of the water in the storage pit, while pulling gently on the tube so that the part in the shelter is practically straight. Exhale as much breath as you can, then place the end of the tube in your mouth, and suck hard and long. (The longer the tube or hose and the larger its diameter, the more times you will have to suck to start the flow of water.)
6. Without taking the tube out of your mouth, shut it off airtight by bending it double near the end.
7. Exhale, straighten the tube, and suck again, repeating until you feel a good flow of water into your mouth while still sucking. Shut off the flow by bending the tube double before taking it out of your mouth.
8. Quickly lower the end of the tube (which is now full of water) and place the closed end in a container on the shelter floor. Finally, open the end to start the siphoned flow.
9. When you have siphoned enough water, stop the flow by bending the tube double. Keep it closed in the doubled-over, air-tight position with a strong rubber band or string, as shown in Fig. 8.8. To prevent loss of water by accidental siphoning, suspend the end of the tube a couple of inches higher than the surface of the water in the storage pit outside and close to where the tube comes into the shelter. (Despite precautions, air may accumulate in the highest part of the tube, blocking a siphoned flow and making it necessary to re-start the siphoning by repeating the sucking.)


DISINFECTING WATER
Water-borne diseases probably would kill more survivors of a nuclear attack than would fallout- contaminated water. Before an attack, if water from a municipal source is stored in expedient containers that could be unclean, it should be disinfected. For long storage, it is best to disinfect all water, since even a few organisms may multiply rapidly and give stored water a bad taste or odor. Properly disinfected water remains safe for many years if stored in thick plastic or glass containers sealed airtight. For multi-year storage do not use thin plastic containers, such as milkjugs, which in time often develop leaks.
Book Page: 71
Any household bleach solution, such as Clorox, that contains sodium hypochlorite as its only active ingredient may be used as a source of chlorine for disinfecting. The amount of sodium hypochlorite, usually 5.25%, is printed on the label. (In recent years, perhaps as a precaution against drinking undiluted chlorine bleach solution, some household bleach containers show a warning such as "Not For Personal Use." This warning can be safely disregarded if the label states that the bleach contains only sodium hypochlorite as its active ingredient, and if only the small quantities specified in these and other instructions are used to disinfect water.) Add 1 scant teaspoonful to each 10 gallons of clear water, and stir. Add 2 scant teaspoonfuls if the water is muddy or colored. Wait at least 30 minutes before drinking, to allow enough time for the chlorine to kill all the microorganisms.24 Properly disinfected water should have a slight chlorine odor.
To disinfect small quantities of water, put 2 drops of household bleach containing 5.25% sodium hypochlorite in each quart of clearwater. Use 4 drops if the water is muddy or colored.24 If a dropper is not available, use a spoon and a square-ended strip of paper or thin cloth about 1/4 inch wide by 2 inches long. Put the strip in the spoon with an end hanging down about 2 inch beyond the end of the spoon. Then when bleach is placed in the spoon and the spoon is carefully tipped, drops the size of those from a medicine dropper will drip off the end of the strip.
As a second choice, 2% tincture of iodine can be used. Add 5 drops to each quart of clear water, and let stand 30 minutes.24 If the water is cloudy, add 10 drops to each quart. Commercial water purification tablets should be used as directed.
If neither safe water nor chemicals for disinfecting it are available during a crisis, store plenty of the best water at hand even muddy river water. Most mud settles to the bottom in a few days; even in a crowded shelter ways often could be found to boil water. Bringing water to a boil for one minute kills all types of disease-causing bacteria.24 Boiling for 10 to 20 minutes is required to kill some rarer infective organisms.
SOURCES OF WATER IN FALLOUT AREAS
Survivors of a nuclear attack should realize that neither fallout particles nor dissolved radioactive elements or compounds can be removed from water by chemical disinfection or boiling. Therefore, water should be obtained from the least radioactive sources available. Before a supply of stored drinking water has been exhausted, other sources should be located. The main water sources are given below, with the safest source listed first and the other sources listed in decreasing order of safety.
1. Water from deep wells and from water tanks and covered reservoirs into which no fallout particles or fallout-contaminated water has been introduced. (Caution: Although most spring water would be safe, some spring water is surface water that has flowed into and through underground channels without having been filtered.)
2. Water from covered seepage pits or shallow, hand-dug wells. This water is usually safe IF fallout or fallout-contaminated surface water has been prevented from entering by the use of waterproof coverings and by waterproofing the surrounding ground to keep water from running down outside the well casing. Figure 8.9 is taken from a Chinese civil defense manual.21 It shows a well dug to obtain safe water from a fallout contaminated source. If the earth is not sandy, gravelly, or too porous, filtration through earth is very effective.
3. Contaminated water from deep lakes. Water from a deep lake would be much less contaminated by dissolved radioactive material and fallout particles than water from a shallow pond would be, if both had the same amount of fallout per square foot of surface area deposited in them. Furthermore, fallout particles settle to the bottom more rapidly in deep lakes than in shallow ponds, which are agitated more by wind.
4. Contaminated water from shallow ponds and other shallow, still water.
5. Contaminated water from streams, which would be especially dangerous ifthe stream is muddy from the first heavy rains after fallout is deposited.
(Illustration)Fig. 8.9. A water-filtering well.This Chinese drawing specifies that this well should be dug 5 to 10 meters (roughly 5 to 10 yards) from a pond or stream. 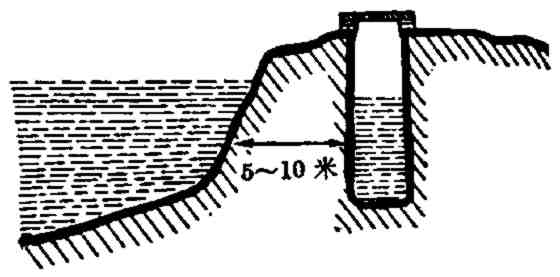
Book Page: 72
The first runoff will contain most of the radioactive material that can be dissolved from fallout particles deposited on the drainage area.25 Runoff after the first few heavy rains following the deposit of fallout is not likely to contain much dissolved radioactive material, or fallout.
6. Water collected from fallout-contaminated roofs. This would contain more fallout particles than would the runoff from the ground.
7. Water obtained by melting snow that has fallen through air containing fallout particles, or from snow lying on the ground onto which fallout has fallen. Avoid using such water for drinking or cooking, if possible.
WATER FROM WELLS
The wells of farms and rural homes would be the best sources of water for millions of survivors. Following a massive nuclear attack, the electric pumps and the pipes in wells usually would be useless. Electric power in most areas would be eliminated by the effects of electromagnetic pulse (EM P) from high-altitude bursts and by the effects of blast and fire on power stations, transformers, and transmission lines. However, enough people would know how to remove these pipes and pumps from wells so that bail- cans could be used to reach water and bring up enough for drinking and basic hygiene.
Fig. 8.10. Lower part of an expedient bail-can. The unattached, "caged" valve can be made of a material that does not have the springiness of soft rubber. ORNL-DWO 78-6691R (Illustration) 
How to make a simple bail-can is illustrated in Fig. 8.10. An ordinary large fruit-juice can will serve, if its diameter is at least 1 inch smaller than the diameter of the well-casing pipe. A hole about 1 inch in diameter should be cut in the center of the can's bottom. The hole should be cut from the inside of the can: this keeps the inside of the bottom smooth, so it will serve as a smooth seat for a practically watertight valve. To cut the hole, stand the can on a flat wood surface and press down repeatedly with the point of a sheath knife, a butcher knife, or a sharpened screwdriver.
The best material for the circular, unattached valve shown in Fig. 8.10 is soft rubber, smooth and thin, such as inner-tube rubber. Alternately, the lid of a can about 3/4 inch smaller in diameter than the bail- can may be used, with several thicknesses of plastic film taped to its smooth lower side. Plastic film about 4 mils thick is best. The bail (handle) of a bail-can should be made of wire, with a loop at the top to which a rope or strong cord should be attached.
Filling-time can be reduced by taping half-apound of rocks or metal to the bottom of the bail-can.
REMOVING FALLOUT PARTICLES AND DISSOLVED RADIOACTIVE MATERIAL FROM WATER
The dangers from drinking fallout contaminated water could be greatly lessened by using expedient settling and filtration methods to remove fallout particles and most of the dissolved radioactive material. Fortunately, in areas of heavy fallout, less than 2% of the radioactivity of the fallout particles contained in the water would become dissolved in water.25 If nearly all the radioactive fallout particles could be removed by filtering or settling methods, few casualties would be likely to result from drinking and cooking with most fallout- contaminated watr.
° Filtering
Filtering through earth removes essentially all of the fallout particles and more of the dissolved radioactive material than does boiling-water distillation, a generally impractical purification method that does not eliminate dangerous radioactive iodines. Earth filters are also more effective in removing radioactive iodines than are ordinary ion-exchange water softeners or charcoal filters. In areas of heavy fallout, about 99% of the radioactivity in water could be removed by filtering it through ordinary earth. 73
Fig. 8.11. Expedient filter to remove radioactivity from water. ORNL DWG 77-18431 (Illustration) 
To make the simple, effective filter shown in Fig. 8.11, the only materials needed are those found in and around the home. This expedient filter can be built easily by proceeding as follows:
1. Perforate the bottom of a 5-gallon can, a large bucket, a watertight wastebasket, or a similar container with about a dozen nail holes. Punch the holes from the bottom upward, staying within about 2 inches of the center.
2. Place a layer about 1 inches thick of washed pebbles or small stones on the bottom of the can. If pebbles are not available, twisted coat-hanger wires or small sticks can be used.
3. Cover the pebbles with one thickness of terrycloth towel, burlap sackcloth, or other quite porous cloth. Cut the cloth in a roughly circular shape about 3 inches larger than the diameter of the can.
4. Take soil containing some clay almost any soil will do from at least 4 inches below the surface of the ground. (Nearly all fallout particles remain near the surface except after deposition on sand or gravel.)
5. Pulverize the soil, then gently press it in layers over the cloth that covers the pebbles, so that the cloth is held snugly against the sides of the can. Do not use pure clay (not porous enough) or sand (too porous). The soil in the can should be 6 to 7 inches thick.
6. Completely cover the surface of the soil layer with one thickness of fabric as porous as a bath towel. This is to keep the soil from being eroded as water is poured into the filtering can. The cloth also will remove some of the particles from the water. A dozen small stones placed on the cloth near its edges will secure it adequately.
7. Support the filter can on rods or sticks placed across the top of a container that is larger in diameter than the filter can. (A dishpan will do.)
The contaminated water should be poured into the filter can, preferably after allowing it to settle as described below. The filtered water should be disinfected by one of the previously described methods.
If the 6 or 7 inches of filtering soil is a sandy clay loam, the filter initially will deliver about 6 quarts of clear water per hour. (If the filtration rate is faster than about 1 quart in 10 minutes, remove the upper fabric and recompress the soil.) After several hours, the rate will be reduced to about 2 quarts per hour.
When the filtering rate becomes too slow, it can be increased by removing and rinsing the surface fabric, removing about 1 inch of soil, and then replacing the fabric. The life of a filter is extended and its efficiency increased if muddy water is first allowed to settle for several hours in a separate container, as described below. After about 50 quarts have been filtered, rebuild the filter by replacing the used soil with fresh soil.
° Settling
Settling is one of the easiest methods to remove most fallout particles from water. Furthermore, if the water to be used is muddy or murky, settling it before filtering will extend the life of the filter. The procedure is as follows:
1. Fill a bucket or other deep container three quarters full of the contaminated water.
2. Dig pulverized clay or clayey soil from a depth of four or more inches below ground surface, and stir it into the water. Use about a 1-inch depth of dry clay or dry clayey soil for every 4-inch depth of water. Stir until practically all the clay particles are suspended in the water.
Book Page: 74
3. Let the clay settle for at least 6 hours. The settling clay particles will carry most of the suspended fallout particles to the bottom and cover them.
4. Carefully dip out or siphon the clear water, and disinfect it.
° Settling and Filtering
Although dissolved radioactive material usually is only a minor danger in fallout-contaminated water, it is safest to filter even the clear water produced by settling, if an earth filter is available. Finally as always the water should be disinfected.
POST-FALLOUT REPLENISHMENT OF STORED WATER
When fallout decays enough to permit shelter occupants to go out of their shelters for short periods, they should try to replenish their stored water. An enemy may make scattered nuclear strikes for weeks after an initial massive attack. Some survivors may be forced back into their shelters by the resultant fallout. Therefore, all available water containers should be used to store the least contaminated water within reach. Even without filtering, water collected and stored shortly after the occurrence of fallout will become increasingly safer with time, due particularly to the rapid decay of radioactive iodines. These would be the most dangerous contaminants of water during the first few weeks after an attack.
Book Page: 75
| |
|
One-Stop Straight FAQ's with free plans, books & ready made shelter sources! |
|
for Potassium Iodide (KI) tablets, Potasium Iodate (KIO3) pills, and all forms of radiation protection iodine! |
|
Straight FAQ's on FEMA Surplus Civil Defense Meters with Retail and Wholesale Sources Listed! |